 Joint examination is the basic examination of any joint. No matter what joint you are looking at, the same process should follow. All joints will move in a set parameter, so they will have their normal, natural movement. In your joint examination, you will be looking for any signs of unnatural movement or pain.
Identifying the Injured Joint
If you look at people who have injuries in sport and other physical activities, they will test every joint before they say they are okay. For example, if you see a footballer on the floor having hurt their knee, they start off by moving their toes, then their ankle and then their knee, until they find the point of pain. If, however, they do not do this, tell them to move each joint individually, starting with the joint furthest away from the body (the fingers or toes). More than one joint may have been affected, and there may even be more than one limb which is affected.
Visual Examination
Start off by ensuring that you do not move it into a position where it is uncomfortable. Also, if the patient is adamant in not wanting to move it from where it is, leave it in that position. Look for any deviations, strange shapes or positions or any unnatural movement. Also looking for any swelling, blood vessels bursting/bruising and obvious muscles damage. Tendons and ligaments will swell very quickly when a joint is damaged because fluid will immediately start to fill the joint space. It also creates heat, so feel the joint. Is the joint a normal temperature, or is it hot? Are there any bruises? Bruising will come to the surface. Ecchymosis, which is a fancy name for bruising, will come through to the surface very quickly. Are there any fractures or open areas? Has a bone fractured and come to the surface of the skin and maybe gone back inside again, or is it still protruding?
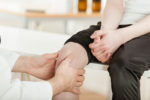
Physical Examination
Next, you will assess the mobility of the joint – how much can it move with little pain to the patient? How do the tendons flex? Is the movement normal? Of course, you are not trying to hurt the patient, you are trying to assess the amount of movement the joint has got, and when and where the pain starts to come in. Tell them this, especially if they become distressed.
Another thing that is always useful is to test the cap refill. Squeeze the blood from the tip of the finger or toe and allow it to refill. Does the blood refill like normal or does it take a long time? Is there an occlusion (blockage) of a blood vessel travelling down into the limb itself? Is it a normal colour or has it become discoloured? It is going to be blue if there is a major occlusion, and the EMS should be contacted to seek further advice.
Another thing that sometimes occurs is crepitus, especially with larger joints such as the hip or shoulder. If you actually hold the joint and move it gently, there may be bone-on-bone movement. You would be able to feel this through the surface of the skin. In the worst cases, you may even be able to hear it. You do not want to exacerbate the problem, so be extremely gentle especially if you suspect this. It then needs to be immobilised in an appropriate method, before being transferred to hospital – as this would be a very serious situation which would require medical attention. If the patient is in pain, treat the pain before you start doing major examinations.
Swelling
Finally, always remember swelling. When body parts swell, things like watches and rings become very tight and almost impossible to remove. Should the swelling continue, blood circulation will be cut off. Therefore it is better if they are taken off early and put somewhere safe rather than having to be cut off and broken at a later stage.
For more information on training courses, visit our “Courses” page which also includes our First Responder and First Person on Scene (FPOS) Courses.
Pingback: Strain and a sprains what is the difference between
Pingback: Amputated limbs and how we deal with amputated parts
Pingback: Pelvic injuries, how they happen and how we treat them